Showing posts with label scrap. Show all posts

Sunday, December 8, 2013

Gifts in a jar!


I have a crazy obsession with mason jars!


I make my own "Redneck WineGlasses", and I also love just the jars themselves.
Mason jars are perfect for holiday gift giving since there are so many different things you can do with them.
I am going to share with you all a few ideas I have found around the web of amazing ideas for gifts in a jar!
The first one I have for you is the Reindeer Cookie Mix from The Home Heart
http://thehomeheart.wordpress.com/2012/11/30/reindeer-cookies/
This can be done with many different cookie recipes. The key is to layer the ingredients to show great contrast.
 
I just love this one from Play as U Go and it is so simple!
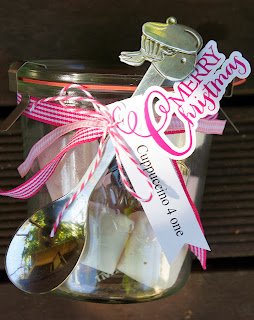
http://playasugo.blogspot.com/2013/11/merry-christmas-for-girls-and-boys.html
 
Remember It is the little embellishments that make the difference! I love ribbons and tags.
 
I also found some super cute tags at The Country Chic Cottage
 
http://www.thecountrychiccottage.net/2013/04/teacher-appreciation-gift-ideas-in.html
 
 
And of course all of the gifts do not have to be edible.
There is also the Pamper Yourself Jar from Milk Bubble Tea
 
http://milkbubbletea.blogspot.de/2013/04/pamper-yourself-gift-jar.html
 
And for the Big Spender in your life....
Maybe suggest a savings plan!

Easily print out this weekly savings plan and this super cute homemade jar should help them start on the road to saving!
 
Well folks there ya have it! Gifts in a jar! So easy and inexpensive but yet very cute to give as a gift for anyone!
 
Merry Christmas!!!!!!


Thursday, March 7, 2013

DIY Wall Hanging

 
I am always looking for new thrifty ways to decorate my home. I have a ton of scrap booking stuff and thought there has got to be more to do with it than just "scrap booking"'
I am not sure where I got the idea from in the beginning but I have changed it and adapted to fit my needs.


I used cardboard boxes, spray adhesive glue (maybe some craft glue as well), some scrap booking stickers and papers, an exacto knife, a ruler and something to hang it from the wall (I used tape).
I chose papers that were cute and girly because I will be putting this in Julie and Kt's room.


I have a bunch of boxes laying around so that is what I used for this part. You could also use foam board you can get for as cheap as $1 a piece at a Dollar Tree if you have one near you. Otherwise any other department store or craft store will probably carry it.


I had a hard time deciding what shape and papers I wanted to use but for this being my first time I just went with basic squares. I cut out different size squares from the cardboard and matching size papers to go on top of them. Then, taking the spray adhesive,  I sprayed one side of the cardboard and placed the papers right on top.
 
Note: The spray glue is repositionable until it sets good so you have a little time to move it around but, be careful and work quickly.
 
Next, I had to decide the design I wanted. This was the hardest part for me. I tried several different positions by laying the "pictures" out and seeing how I liked them. You would do well to have an idea of where you are going to hang this while trying to shape the design.
Once I had the design laid out I tried to use the spray glue to piece the shapes together but it didn't seem to hold very well on all of the pieces, so I used my craft glue (E6000) instead and this worked great!
I let it sit for a couple hours just to be sure the glue dried.


This is what I ended up with.
 
I think it turned out pretty well and I just used some tape stuck to the back to adhere it to the wall. However, I would not recommend this on just any wall. Use something safe for the texture of your walls.